February 2024: We’ve updated the guide with better explanations on what each slider does in OBS.
Update April 2020: We’ve created a guide on how to use OBS as a virtual webcam, learn how to here.
The use of chroma keying has become quite popular in recent years, with many applications of this video effect used for live streaming. Chroma keying is used to remove the background of a video scene which is then composited over another scene or image. The most obvious use of this technique is for weather broadcasts, where the presenter is composited over the top of a weather radar image. In more recent times we’re seeing video game streamers chroma keying themselves into their live streams.
In the days before computers, creating this effect was an tedious process. If you want to learn how they did chroma keying in the past, then I’d recommend watching this great video by Tom Scott.
These days most live streaming software packages include chroma keying as a feature. In this guide we’ll show you how to achieve this great effect with OBS (Open Broadcaster Software).
As with all things in video production, you can easily spend a fortune on equipment. For the purpose of this guide, we’ve tried to keep things reasonably cheap. For the green background we picked up some green fabric from a local arts and craft store. Alternatively, you can buy green screen paint if you’re looking for a more permanent setup.
We’re using a Logitech c930e webcam for the video source. If you want to use a better quality camera, such as a DSLR, then you will need a video capture card. We often recommend the Magewell HDMI to USB3 dongle for video capture.
Lighting is very important when it comes to green screens as you want the green to be as even as possible. In our set up we’ve used a single box light. We’ll go into more detail about lighting below.
Stage set-up:
The first thing to do with any live stream is to plan your shoot. Will the camera remain stationary, or will you be moving it? Once you’ve determined the shot, you can calculate roughly how much green screen you need. It’s prudent to allow for a bit of extra green screen around the subject to avoid having them clipped outside of the chroma keyed area.
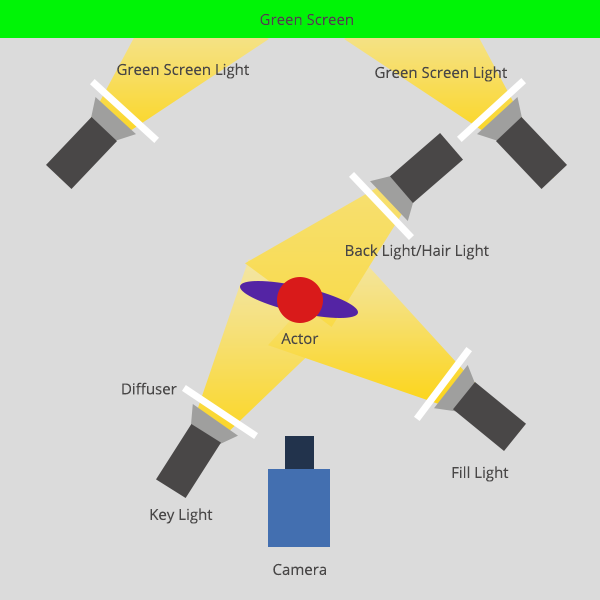
I won’t delve too deep into the best lighting setup, but for professional shoots it’s recommended to have three types of lighting. Back lights, key lights and fill lights. To the right is an image which gives you an idea of a typical lighting setup. If you want to learn more about green screen lighting, I recommend checking out this video.
Additionally, consider having a reasonable amount of distance between the subject and the green screen. The closer the subject is to the screen, the greater the shadow cast.
OBS set-up:
If you’ve correctly set-up the green screen and lighting, the chroma keying should be reasonably simple.
Open up OBS and add your video source.
Right click on the video source and select ‘Filter’.
Click the ‘+’ under the ‘Effects Filters’ section, then select ‘Chroma Key’.
Enter a name for the effect layer.
When adding a chroma key OBS will automatically generate some baseline settings. In most cases you’ll need to fine tune the settings in the screenshot below. I’d recommend experimenting with the sliders to see what they do.
Some quick explanations on what each of the sliders do:
Key Color Type: This is the color you wish to remove from the background. Select ‘Green’ if you’re using a traditional green screen. If you want to remove a different color, then use the color picker to select it.
Similarity: Unless you have a perfect green screen setup, there will be a range of green colours in the background because of shadows or lighting imperfections. The higher the similarity slider, the more colors it will chroma key out e.g. if you slide it all the way to the right, everything will be removed.
Smoothness: This is essentially anti-aliasing, and it will smooth the edges of the chroma keyed subject. If you set it too high, then it can make the subject look blurry on the edges.
Key Color Spill Reduction: If your subject is too close to the green screen it can sometimes reflect on their hair or clothing. The key color spill reduction tries to fix this by altering the key color on the subject. If you set this option too high, then it will make the subject grey, so play around with this one to find the best setting.
Opacity: If you want to fully remove the background, set this option to 100.
Contrast: If you’ve had to set the key color spill reduction quite high, then you can use this contrast option to try and return the colors back to normal.
Once you’re happy with the chroma key settings you should then do a quick run through of your shoot. If the subject is going to remain stationary, you’re likely good to go. If there’s going to be movement, you should double check every position the subject will be in to make sure the chroma key settings are correct for the whole shoot.
After you’ve confirmed the chroma key settings are correct, you can now add your background layer(s). You will need to make sure they’re below the chroma keyed camera layer in OBS.