Using OBS as a Virtual Webcam on Windows and MacOS
With more and more people working from home in the current global environment, we’re seeing an increase in the number of people asking how to use OBS as a virtual webcam for video conferencing solutions such as Zoom, Microsoft Teams, Skype and Google Meet.

You might want to use OBS as a webcam source as it gives you a plethora of production options, such as picture in picture, chroma key (green screen) etc. This is great if you’re giving company presentations, or just want to mess with your colleagues with a weird green screen background.
The installation complexity will vary depending on your operating system. If you’re using Windows, then congratulations, the installation is quite simple! If you’re using MacOS then ideally you’ll need a second monitor and need to run multiple programs.
It looks like this feature will soon be natively supported in OBS, as Tobi Lutke (the founder of Shopify) has just recently placed a $10,000 bounty for the feature. Until then we’re left with the following methods. Update June 2020: There is now an OBS virtual cam plugin for Mac. The mac section below has been updated with a link to it. Update January 2021: VirtualCam for MacOS is now natively included in OBS 26.1, so you no longer need to download any plugins.

Windows: Using OBS as a Virtual Webcam
Requirements:
- Windows Operating System
- OBS (Open Broadcaster Software)
- OBS-VirtualCam plugin (download here)
Setup:
- Install OBS-VirtualCam.
- Reboot computer.
- Setup OBS, with optional chroma key (guide here).
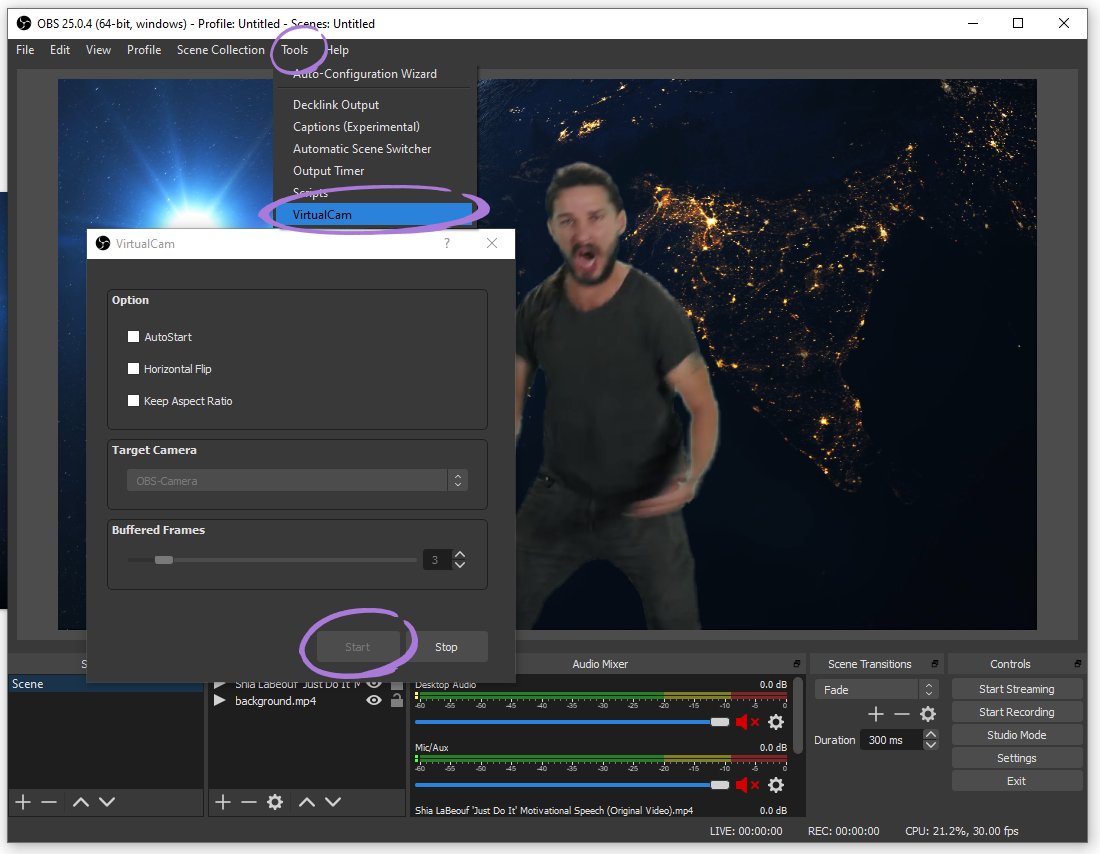
- In OBS select ‘Tools’ from the top menu, then ‘VirtualCam’.
- Click the ‘Start’ button. Optionally check ‘AutoStart’ if you want to have VirtualCam start whenever OBS is running.
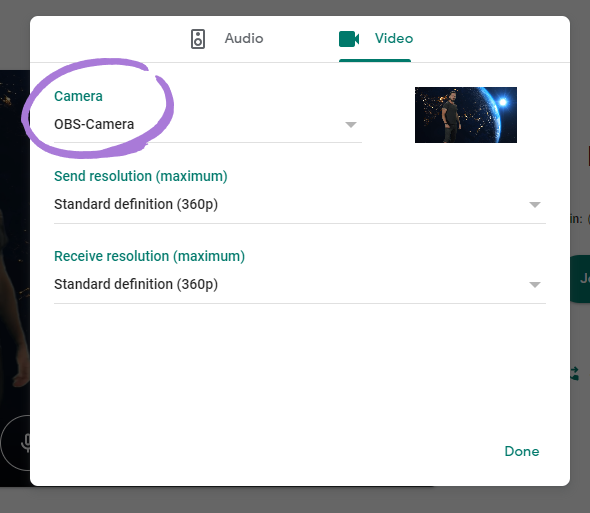
- Done! You should now see ‘OBS-Camera’ as a webcam option. Note: You will still need to select your usual microphone as the audio source.

MacOS: Using OBS as a Virtual Webcam
Update January 2021: VirtualCam is now natively included in OBS 26.1, so you no longer need to download the plugin listed below.
Update June 2020: There’s now a MacOS version of OBS VirtualCam. This can be downloaded here. The process to use the software is basically the same as the Windows method listed above.
We’ve kept the old CamTwist guide below, but it’s no longer the best method to use.
Unfortunately for Mac users, the quality of the video output from this method is much lower than the Windows method. Additionally you will ideally want a second monitor, because if any window or program moves in front of the capture area, it will be displayed on the video stream.
Requirements:
MacOSOBS (Open Broadcaster Software)CamTwist (download here)Optional: Second monitor
Setup:
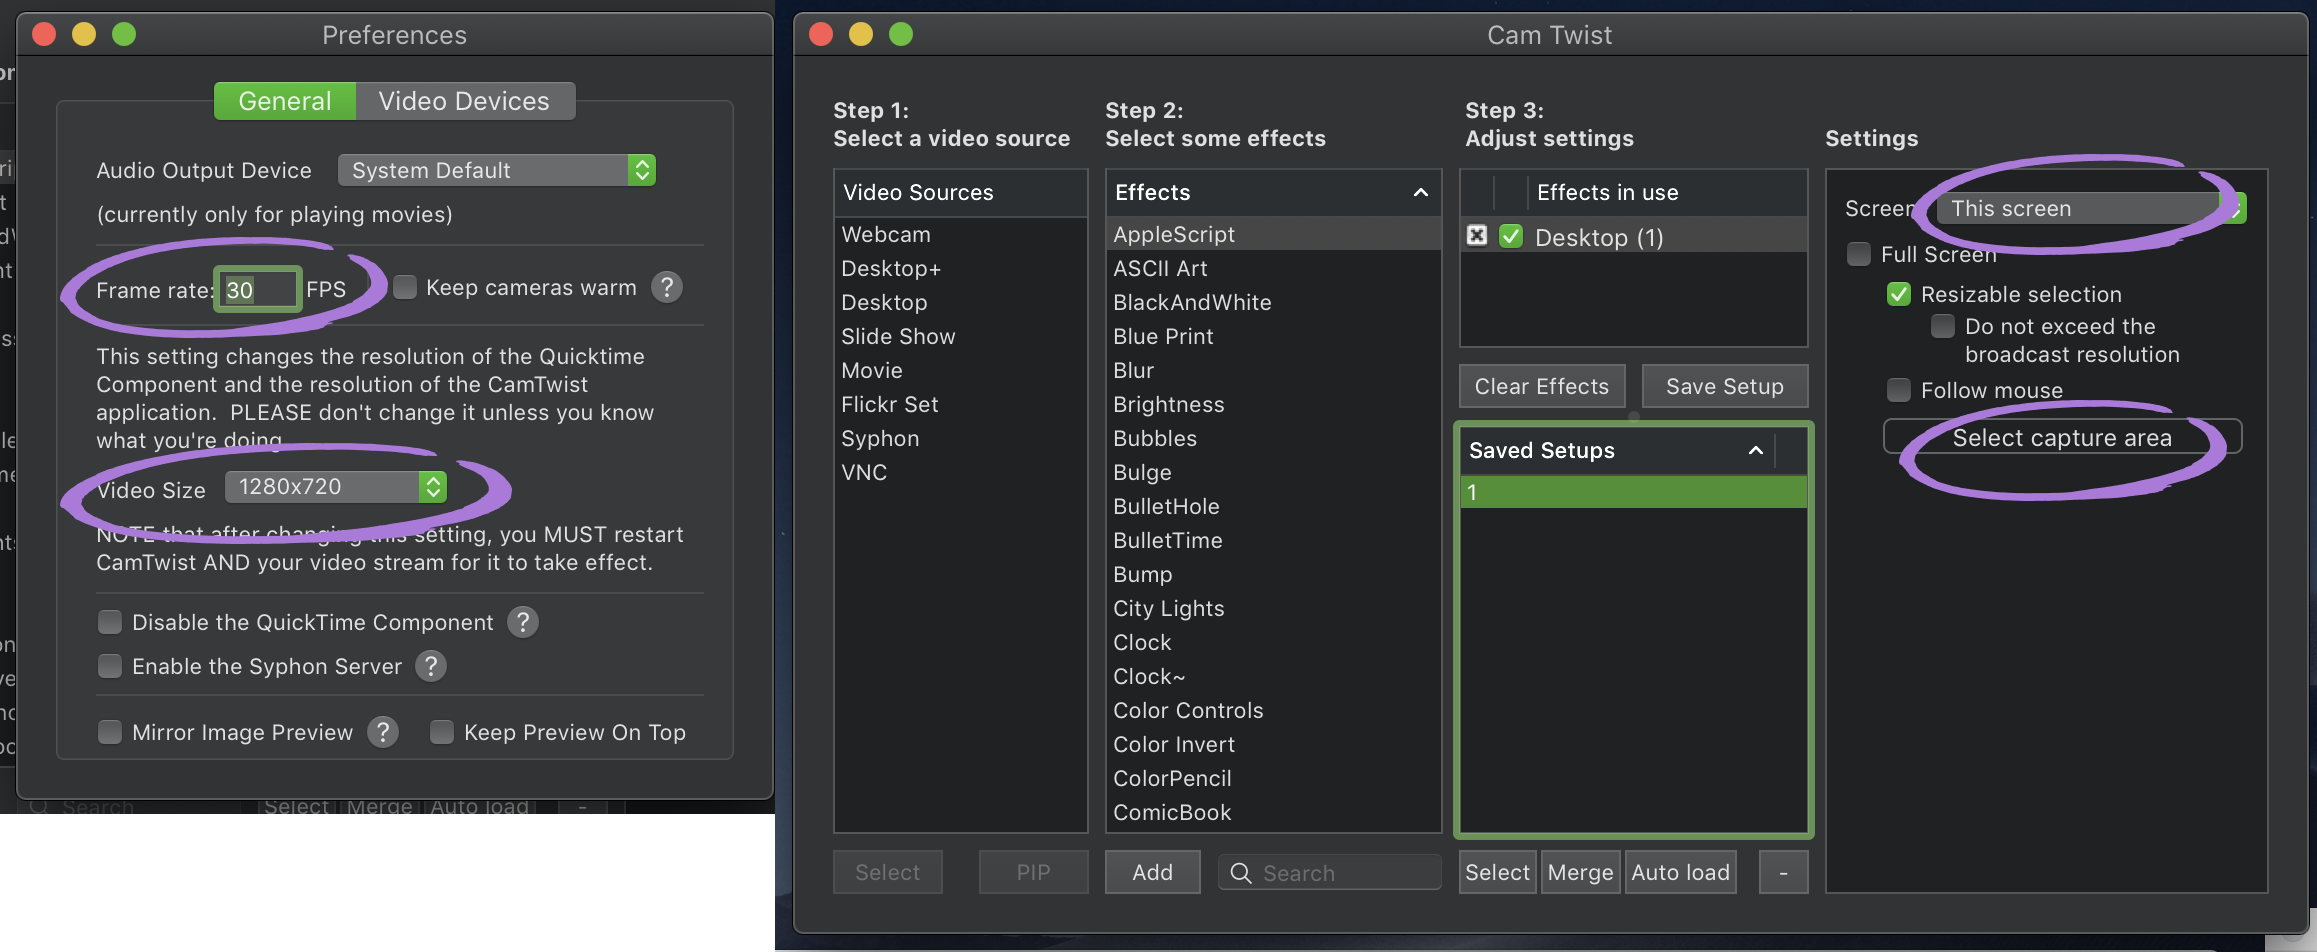
Install CamTwist.Reboot computer.Setup OBS, with chroma key if desired (guide here).If using a second monitor – In OBS right click on canvas and select ‘Fullscreen Projector’ and send it to your desired monitor.If using a single monitor – Resize the OBS canvas to take up a small portion of your screen.Open CamTwist.In the CamTwist preferences select your desired frame rate, and video size.Close the preferences and go to the main CamTwist options.Select ‘Desktop’ and then select the monitor your OBS output is being displayed on OR do a resizeable selection of the same screen.Done! You should now see ‘Cam Twist’ as a webcam option.


san
Hi –
Installed OBS 26.1.2 on a MacBook Pro, can’t find the Virtual Web Camera option (or how to set it up to show in Teams/Zoom). Any help will be appreciated.
Markus
In a company environment often the installation (WIN 10, with installer) of non tested software is blocked. Fortunately OBS can run without installation. But it seems that the virtual camera cannot be used when files are just copied to OBS standard folder. Did I miss something or is there a workaround?
Cameron
I doubt it would work if you can’t run the installer as there’s likely drivers required for the webcam emulation.
Chelley
Hello. I just want to know, how can I remove obs virtual camera on my Mac? My software is big surs
Helge
The MacOS plugin is now part of OBS 26.1. So no reason to download and install the plugin.
Cameron
Hi Helge,
Thanks for letting us know! I’ll update the guide.
Cheers,
Cameron
Anna Simona Garofalo
Hello everyone, someone could explain me ho to uninstall the virtual camera plugin from obs for Mac, please?
Dan Smith
I have MacOS Elcapitan and the last compatible version of OBS is 24.0.2. The OBS Mac virtual CAM plugin is only working with newer versions of OBS. Is there a way to use a virtual CAM to use OBS 24.0.2 with Skype, Zoom, etc. I am looking for a CamTwist alternative.
Antony Upward
Hi Dan… this is exactly my situation too… I wonder if anyone has tried to install the version of OBS that can run the virtual cam plugin on OS 10.11.6 El Capitan to see if this part of the functionality “just works”. You never know what changes in the OS the plugin relies on… could be very minor (or not).
Luis
Hi, did you find any solution on this issue???
Juju
Hi all.. I just want to know is it possible to used OBS in mac OS mojave? I need to use it in Google Meet actually.. I need advice. Thanks
Sudeep Chandra
First time user for OBS. I have a mac. I have downloaded OBS and the .pkg file recommend for the virtual cam. I can now start the virtual cam in OBS BUT I can not see it in Zoom or Skype. Any suggestion on how to trouble shoot so I can use OBS with zoom? I am using a Mac with Mojave 10.14.6
Rene
Same issue here. I’ve rebooted but no luck. In tools I can click to start the virtualcam and the menu changes to “stop”, but nothing shows up in Zoom…
Robert
A workaround for this issue is described here (at the end): https://github.com/johnboiles/obs-mac-virtualcam/issues/131
Pyr
Thanks for posting *and updating* information Cameron. Any tips on getting OBS sound through the virtual cam? Right now with Zoom/Teams using the virutal cam for picture and system audio for sound there’s an irritating delay between the two. I’m running system sounds through soundflower and mixing in mics via LadioCast which both work very well, there’s just no provision for adding an audio delay anywhere in the chain that I can find. Thanks again!
Lance
On mac, I use Audio Hijack to add delay to the microphone (60ms in my case). It outputs to Loopback, which is set as the audio source in Teams/Zoom, etc. Audio Hijack can also add gain control, compression, eq, etc. and mix in system or application sounds. Audio Hijack and Loopback are paid products from Rogue Amoeba. I had already purchased their Ultimate Podcast Bundle, so the tools were available for me when I need to solve this problem. At this time they are working on compatibility with Big Sur.
Walter Thomas Jr
I downloaded the MAC OBC virtual cam and installed, restarted Mac and started the virtual camera in OBS but it’s not showing as an option in Zoom.
Reg
I am using OBS VirtualCam plug-in for Mac, and can get the video in OBS to show in Teams no problem… but how do I get system sounds, music, and my yeti microphone to go through OBS and then into teams. The only way I can get sound in teams Is to turn up my music and switch teams to use my yeti as sound… not good 🙂
Cameron
Hi Reg,
You might be able to use the program ‘SoundFlower’ for mac. This would let you send all the audio from your computer to Teams.
Cheers,
Cameron
Craig Barrie
For my Mac I use iShowU Audio Capture set up using this method: https://obsproject.com/forum/resources/os-x-capture-audio-with-ishowu-audio-capture.505/
Manuel
Thanks for this tut, im running on El Capitan, and i had to use “CamTwist” v3.3 you can find the download link in Camtwist facebook page.
David McClelland
Good news for Mac-users: as of April 2020, there is now an OBS VirtualCam plug-in for Mac. I’ve been using it for a few jobs – so far, so good.
Cameron
Thanks for letting me know David. At the time of writing the MacOS version of the plugin still required the user to manually compile it, so wasn’t super useful for most people. I’ve put an update into the blog post.
Cheers,
Cameron